Documentation Index
Fetch the complete documentation index at: https://docs.onebalance.io/llms.txt
Use this file to discover all available pages before exploring further.
To create a truly seamless chain-abstracted experience, we’ll combine OneBalance’s chain abstraction with Privy’s wallet infrastructure. This integration gives your users social login options and a smooth onboarding experience.
# Clone the repository
git clone https://github.com/OneBalance-io/onebalance-privy-demo.git
cd onebalance-privy-demo

# Install dependencies
pnpm install

# Copy environment variables
cp .env.example .env

# Start the development server
pnpm dev
Complete Integration: This guide combines Privy for wallet management with OneBalance for
chain-abstracted functionality, providing the best experience for your users.
Prerequisites
Before you begin, make sure you have:
- Node.js version 20 or higher
- We recommend using nvm to manage your Node.js versions
- pnpm package manager installed
- Privy Dashboard account for your application
- For a faster quickstart, you can use our pre-configured Privy App ID:
cmb94tjcj001xle0mdeerz9vp (recommended)
- Alternatively, you can set up your own Privy application
- OneBalance API Key - we’ll use the public test key for this example:
42bb629272001ee1163ca0dbbbc07bcbb0ef57a57baf16c4b1d4672db4562c11
The pre-configured keys and IDs provided in this guide are strictly for learning purposes. For any
production application, you must use your own Privy App ID and OneBalance API Key.
Set up Node.js with nvm
If you don’t have Node.js installed or need to update, we recommend using nvm:# Install nvm (if not already installed)
curl -o- https://raw.githubusercontent.com/nvm-sh/nvm/v0.40.3/install.sh | bash
# Install and use Node.js 20
nvm install 20
nvm use 20
# Install pnpm globally
# Using npm to install pnpm as a one-time step
npm install -g pnpm
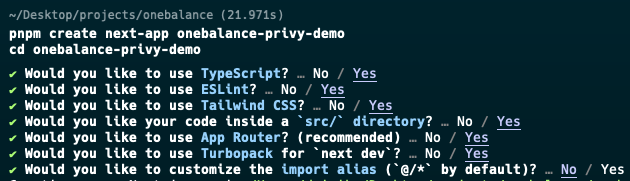
Create a new project
Set up a new React project using Next.js:pnpm create next-app onebalance-privy-demo
cd onebalance-privy-demo
- Would you like to use TypeScript? › Yes
- Would you like to use ESLint? › Yes
- Would you like to use Tailwind CSS? › Yes
- Would you like your code inside a
src/ directory? › Yes
- Would you like to use App Router? (recommended) › Yes
- Would you like to use Turbopack for
next dev? › Yes
- Would you like to customize the import alias (
@/* by default)? › No
Install dependencies
Install the required packages:pnpm add @privy-io/react-auth viem @tanstack/react-query dotenv axios
.env file in the project root with your API keys:# .env
NEXT_PUBLIC_PRIVY_APP_ID=cmb94tjcj001xle0mdeerz9vp # For quickstart only; use your own in production
NEXT_PUBLIC_ONEBALANCE_API_KEY=42bb629272001ee1163ca0dbbbc07bcbb0ef57a57baf16c4b1d4672db4562c11 # For quickstart only
.env file using command line:# Create .env file
touch .env
# Add environment variables
echo "NEXT_PUBLIC_PRIVY_APP_ID=cmb94tjcj001xle0mdeerz9vp" >> .env
echo "NEXT_PUBLIC_ONEBALANCE_API_KEY=42bb629272001ee1163ca0dbbbc07bcbb0ef57a57baf16c4b1d4672db4562c11" >> .env
Set up CORS handling
When working with the OneBalance API from a browser, you’ll need to handle CORS restrictions. The recommended approach is to create a server-side proxy using Next.js API routes.Create a new file at src/app/api/[...path]/route.ts:// src/app/api/[...path]/route.ts
import { NextRequest, NextResponse } from 'next/server';
// OneBalance API base URL and API key
const API_BASE_URL = 'https://be.onebalance.io';
const API_KEY = process.env.NEXT_PUBLIC_ONEBALANCE_API_KEY || '';
export async function GET(
request: NextRequest,
{ params }: { params: Promise<{ path: string[] }> }
) {
const { path } = await params;
const pathString = path.join('/');
const searchParams = request.nextUrl.searchParams;
try {
// Build the API URL with any query parameters
const apiUrl = new URL(`/api/${pathString}`, API_BASE_URL);
searchParams.forEach((value, key) => {
apiUrl.searchParams.append(key, value);
});
const response = await fetch(apiUrl.toString(), {
headers: {
'Content-Type': 'application/json',
'x-api-key': API_KEY,
},
});
const data = await response.json();
return NextResponse.json(data);
} catch (error) {
return NextResponse.json({ message: 'Failed to fetch data', error }, { status: 400 });
}
}
export async function POST(
request: NextRequest,
{ params }: { params: Promise<{ path: string[] }> }
) {
const { path } = await params;
const pathString = path.join('/');
try {
const body = await request.json();
const response = await fetch(`${API_BASE_URL}/api/${pathString}`, {
method: 'POST',
headers: {
'Content-Type': 'application/json',
'x-api-key': API_KEY,
},
body: JSON.stringify(body),
});
const data = await response.json();
return NextResponse.json(data);
} catch (error) {
return NextResponse.json({ message: 'Failed to fetch data', error }, { status: 400 });
}
}
This proxy implementation ensures proper authentication and CORS handling for all API calls. Learn more about CORS handling in our documentation. Create the OneBalance API client
Now that we have the CORS handling in place, let’s create a client to interact with the OneBalance API through our proxy.Create a file at src/lib/onebalance.ts:// src/lib/onebalance.ts
import axios from 'axios';
// Create an axios client that points to our proxy
export const apiClient = axios.create({
baseURL: '/api',
headers: {
'Content-Type': 'application/json',
},
});
// OneBalance API base URL and API key (for reference)
export const API_BASE_URL = 'https://be.onebalance.io/api';
export const API_KEY = process.env.NEXT_PUBLIC_ONEBALANCE_API_KEY;
// Predict account address for a user based on their Privy wallet
export async function predictAccountAddress(sessionAddress: string, adminAddress: string) {
try {
const response = await apiClient.post('/account/predict-address', {
sessionAddress,
adminAddress
});
return response.data?.predictedAddress;
} catch (error) {
console.error('Error predicting account address:', error);
throw error;
}
}
// Get aggregated balance for a smart account
export async function getAggregatedBalance(address: string) {
try {
const response = await apiClient.get(`/v2/balances/aggregated-balance?address=${address}`);
return response.data;
} catch (error) {
console.error('Error fetching aggregated balance:', error);
throw error;
}
}
// Get a quote for swapping or transferring tokens
export async function getQuote(params: {
from: {
account: {
sessionAddress: string;
adminAddress: string;
accountAddress: string;
};
asset: {
assetId: string;
};
amount: string;
};
to: {
asset: {
assetId: string;
};
};
}) {
try {
const response = await apiClient.post('/v1/quote', params);
return response.data;
} catch (error) {
console.error('Error getting quote:', error);
throw error;
}
}
// Execute a quote after getting user signature
export async function executeQuote(signedQuote: any) {
try {
const response = await apiClient.post('/quotes/execute-quote', signedQuote);
return response.data;
} catch (error) {
console.error('Error executing quote:', error);
throw error;
}
}
// Check transaction status
export async function checkTransactionStatus(quoteId: string) {
try {
const response = await apiClient.get(`/status/get-execution-status?quoteId=${quoteId}`);
return response.data;
} catch (error) {
console.error('Error checking transaction status:', error);
throw error;
}
}
This client implements several core OneBalance API endpoints: Configure Privy Provider
Create a Privy provider component to wrap your application.Create a new file at src/components/PrivyProvider.tsx:// src/components/PrivyProvider.tsx
'use client';
import { PrivyProvider } from '@privy-io/react-auth';
export function PrivyClientProvider({ children }: { children: React.ReactNode }) {
const privyAppId = process.env.NEXT_PUBLIC_PRIVY_APP_ID as string;
// Configure Privy with your app ID
return (
<PrivyProvider
appId={privyAppId}
config={{
loginMethods: ['email', 'passkey', 'wallet'],
appearance: {
theme: 'light',
accentColor: '#FFAB40', // OneBalance accent color
},
embeddedWallets: {
// Create embedded wallets for users who don't have a wallet
createOnLogin: 'users-without-wallets',
},
}}
>
{children}
</PrivyProvider>
);
}
Update your root layout
Update your app’s layout to include the Privy provider:// src/app/layout.tsx
import type { Metadata } from 'next';
import { Inter } from 'next/font/google';
import './globals.css';
import { PrivyClientProvider } from '@/components/PrivyProvider';
const inter = Inter({ subsets: ['latin'] });
export const metadata: Metadata = {
title: 'OneBalance + Privy Demo',
description: 'Seamless chain-abstracted transfers with OneBalance and Privy',
};
export default function RootLayout({
children,
}: Readonly<{
children: React.ReactNode;
}>) {
return (
<html lang="en">
<body className={inter.className}>
<PrivyClientProvider>
{children}
</PrivyClientProvider>
</body>
</html>
);
}
Create login page
Let’s create a simple login page that uses Privy’s login UI:// src/app/page.tsx
'use client';
import { usePrivy } from '@privy-io/react-auth';
import { useRouter } from 'next/navigation';
import { useEffect } from 'react';
export default function Home() {
const { login, ready, authenticated } = usePrivy();
const router = useRouter();
// Redirect to dashboard if already authenticated
useEffect(() => {
if (ready && authenticated) {
router.push('/dashboard');
}
}, [ready, authenticated, router]);
return (
<main className="flex min-h-screen flex-col items-center justify-center p-24">
<div className="max-w-md w-full bg-white p-8 rounded-xl shadow-md text-black">
<h1 className="text-3xl font-bold mb-6">OneBalance Demo</h1>
<p className="mb-6 text-gray-600">
Experience seamless chain-abstracted transactions with OneBalance and Privy
</p>
<button
onClick={login}
className="w-full py-3 px-4 bg-[#FFAB40] text-white rounded-lg font-medium hover:bg-[#FF9800] transition-all"
>
Login with Privy
</button>
<p className="mt-4 text-xs text-gray-500">
Login with email, social, or connect your wallet to get started
</p>
</div>
</main>
);
}
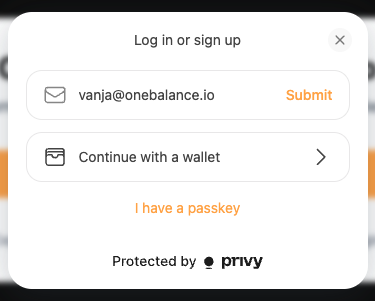 When users choose email login, they’ll receive a verification code to complete the sign-in process. Once verified, Privy will create a secure embedded wallet for them that can be used to sign OneBalance transactions.
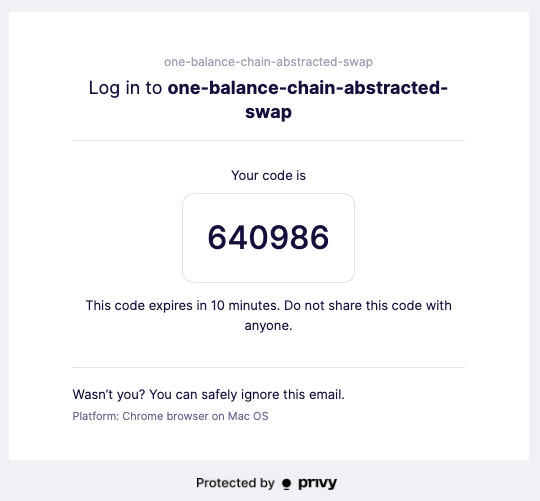
Create a dashboard page
Let’s create a simple dashboard page that we’ll enhance in the next section.Create a new directory and file at src/app/dashboard/page.tsx:// src/app/dashboard/page.tsx
'use client';
import { usePrivy } from '@privy-io/react-auth';
import { useRouter } from 'next/navigation';
export default function Dashboard() {
const { user, logout } = usePrivy();
const router = useRouter();
const handleLogout = async () => {
await logout();
router.push('/');
};
return (
<main className="flex min-h-screen flex-col items-center justify-center p-24">
<div className="max-w-md w-full bg-white p-8 rounded-xl shadow-md text-black">
<h1 className="text-2xl font-bold mb-6">OneBalance Dashboard</h1>
<div className="mb-6">
<div className="text-sm text-gray-500 mb-1">Welcome!</div>
<div className="font-medium">
{user?.email?.address || 'Anonymous User'}
</div>
</div>
<div className="bg-blue-50 p-4 rounded-lg mb-6">
<h2 className="font-semibold mb-2">🎉 Setup Complete!</h2>
<p className="text-sm">
You've successfully logged in with Privy. In the next section, we'll enhance this dashboard to:
</p>
<ul className="text-sm mt-2 ml-4 list-disc">
<li>Set up your OneBalance smart contract account</li>
<li>Display your aggregated token balances</li>
<li>Enable chain-abstracted swaps</li>
</ul>
</div>
<button
onClick={handleLogout}
className="w-full py-2 px-4 bg-gray-200 text-gray-700 rounded-lg font-medium hover:bg-gray-300 transition-all"
>
Logout
</button>
</div>
</main>
);
}
Run the application
Start the development server:Your app should now be running at http://localhost:3000. Open this URL in your browser to see it in action. Understanding Smart Contract Accounts (SCAs)
When you set up OneBalance with Privy, it’s important to understand how the account structure works:
-
Smart Contract Account (SCA):
- This is your actual deposit address where funds are stored
- The SCA enables gas abstraction, allowing you to pay for transactions using any token in your balance, not just the chain’s native gas token
- The SCA is controlled by signers (e.g., your Privy-managed key)
-
Privy-Managed Key:
- The key created via Privy acts as a signer for your SCA
- It allows you to authorize transactions from your SCA
- It is NOT where your funds are stored - the SCA is
-
Account Funding:
- When funding your OneBalance account, send assets to your SCA address (not the Privy EOA address)
- These funds will then appear in your aggregated balance across chains
For this quickstart guide, OneBalance sponsors the underlying network fees for some operations to
provide a smoother demonstration experience. In a production environment, fees are handled
according to the method outlined in our Fees documentation. Important: Always send funds to your SCA address (which you’ll create in the next step), not
to the Privy EOA address.
The User Journey
With Privy integration, users can experience a seamless onboarding flow:
- Simple Authentication: Users can login via email, social accounts, or connecting an existing wallet
- Embedded Wallet Creation: For users without a crypto wallet, Privy automatically creates one
- Smart Contract Account: The Privy wallet acts as a signer for the user’s OneBalance SCA
- Chain-Abstracted Transactions: Users can swap and transfer assets across chains without switching networks
This approach eliminates many barriers to entry for new users while providing a powerful experience for crypto-native users as well.
Understanding the Integration
Our setup combines:
-
Privy for Wallet Infrastructure:
- Social login options (email, passkey)
- Embedded wallet creation and management
- Simplified transaction signing
-
OneBalance for Chain Abstraction:
- Unified access to assets across chains
- Chain-abstracted swaps and transfers with no bridging
- Gas abstraction (pay fees with any token)
- Aggregated balances for a unified view of your assets
-
CORS Handling with Next.js API Routes:
- Server-side proxy to avoid browser CORS restrictions
- Secure API key management
- Consistent error handling
What’s Next?
Now that your environment is set up, we’ll create a dashboard for chain-abstracted operations in the next section.